Over the last few months I have had the opportunity to deliver webinar sessions to KPU faculty exploring Kaltura Capture and Big Blue Button. I’ve also participated in the Level Up workshop series as a guest speaker, hosting conversations about educational technology and media production. I also produced the TLCommons’ first music video, based on the Beatles song Let it Be, which to date has had over 1,200 views on Youtube. What began to emerge out of these workshops and projects were numerous inquiries relating specifically to my home studio setup, the various technologies used in the creation of my videos, and how I set up my living room for producing vlog posts.
Initially, I answered each inquiry in detail via email or TEAMS. But then it occured to me that I could make a blog post that will show you, literally & figuratively, what my home studio looks like and how I create my videos for the TLCommons at KPU. This blog post explores how you can turn your own home office or living room into a production space for creating educational videos. So welcome to my home production studio where I will give you a tour of both production spaces and explain in detail how I have created the optimal conditions for home-based video production.
1. The Home Office Production Space
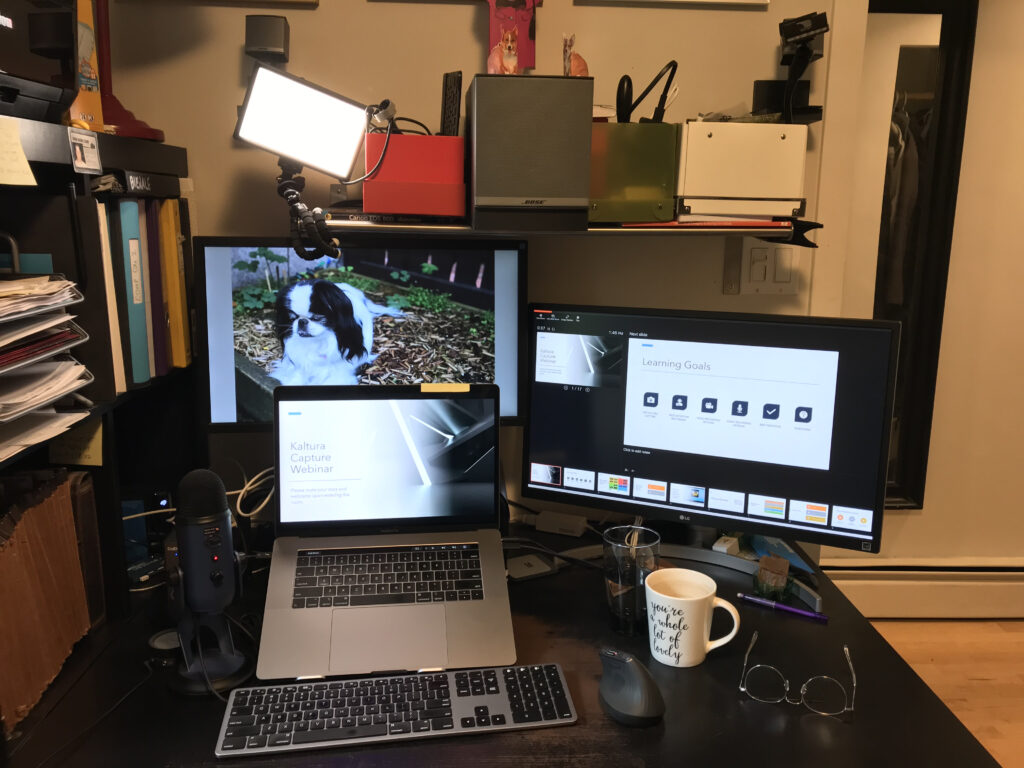
In the last few months I have been redesigning my home office to function more effectively as a video production space. Like many of you, I am in the process of developing courses for online delivery in the fall. This has required much more of a focus on creating video content than before COVID so having a permanent setup at home that is “ready to go” has been instrumental in developing a new workflow.
I have spent countless hours online researching consumer-grade video production technology this summer as I slowly assembled a permanent production space at home. Some items were under inexpensive, costing under $50 and others were more substantial, costing a few hundred dollars. Regardless of the cost, these purchases are all an investment in my teaching practice – money well spent in my humble opinion. In the video below, I walk you through my home office production space and all of the technology that I use to create educational media for my courses. Note, this video was filmed on an OSMO Pocket.
Here is a diagram of the equipment used in this setup:

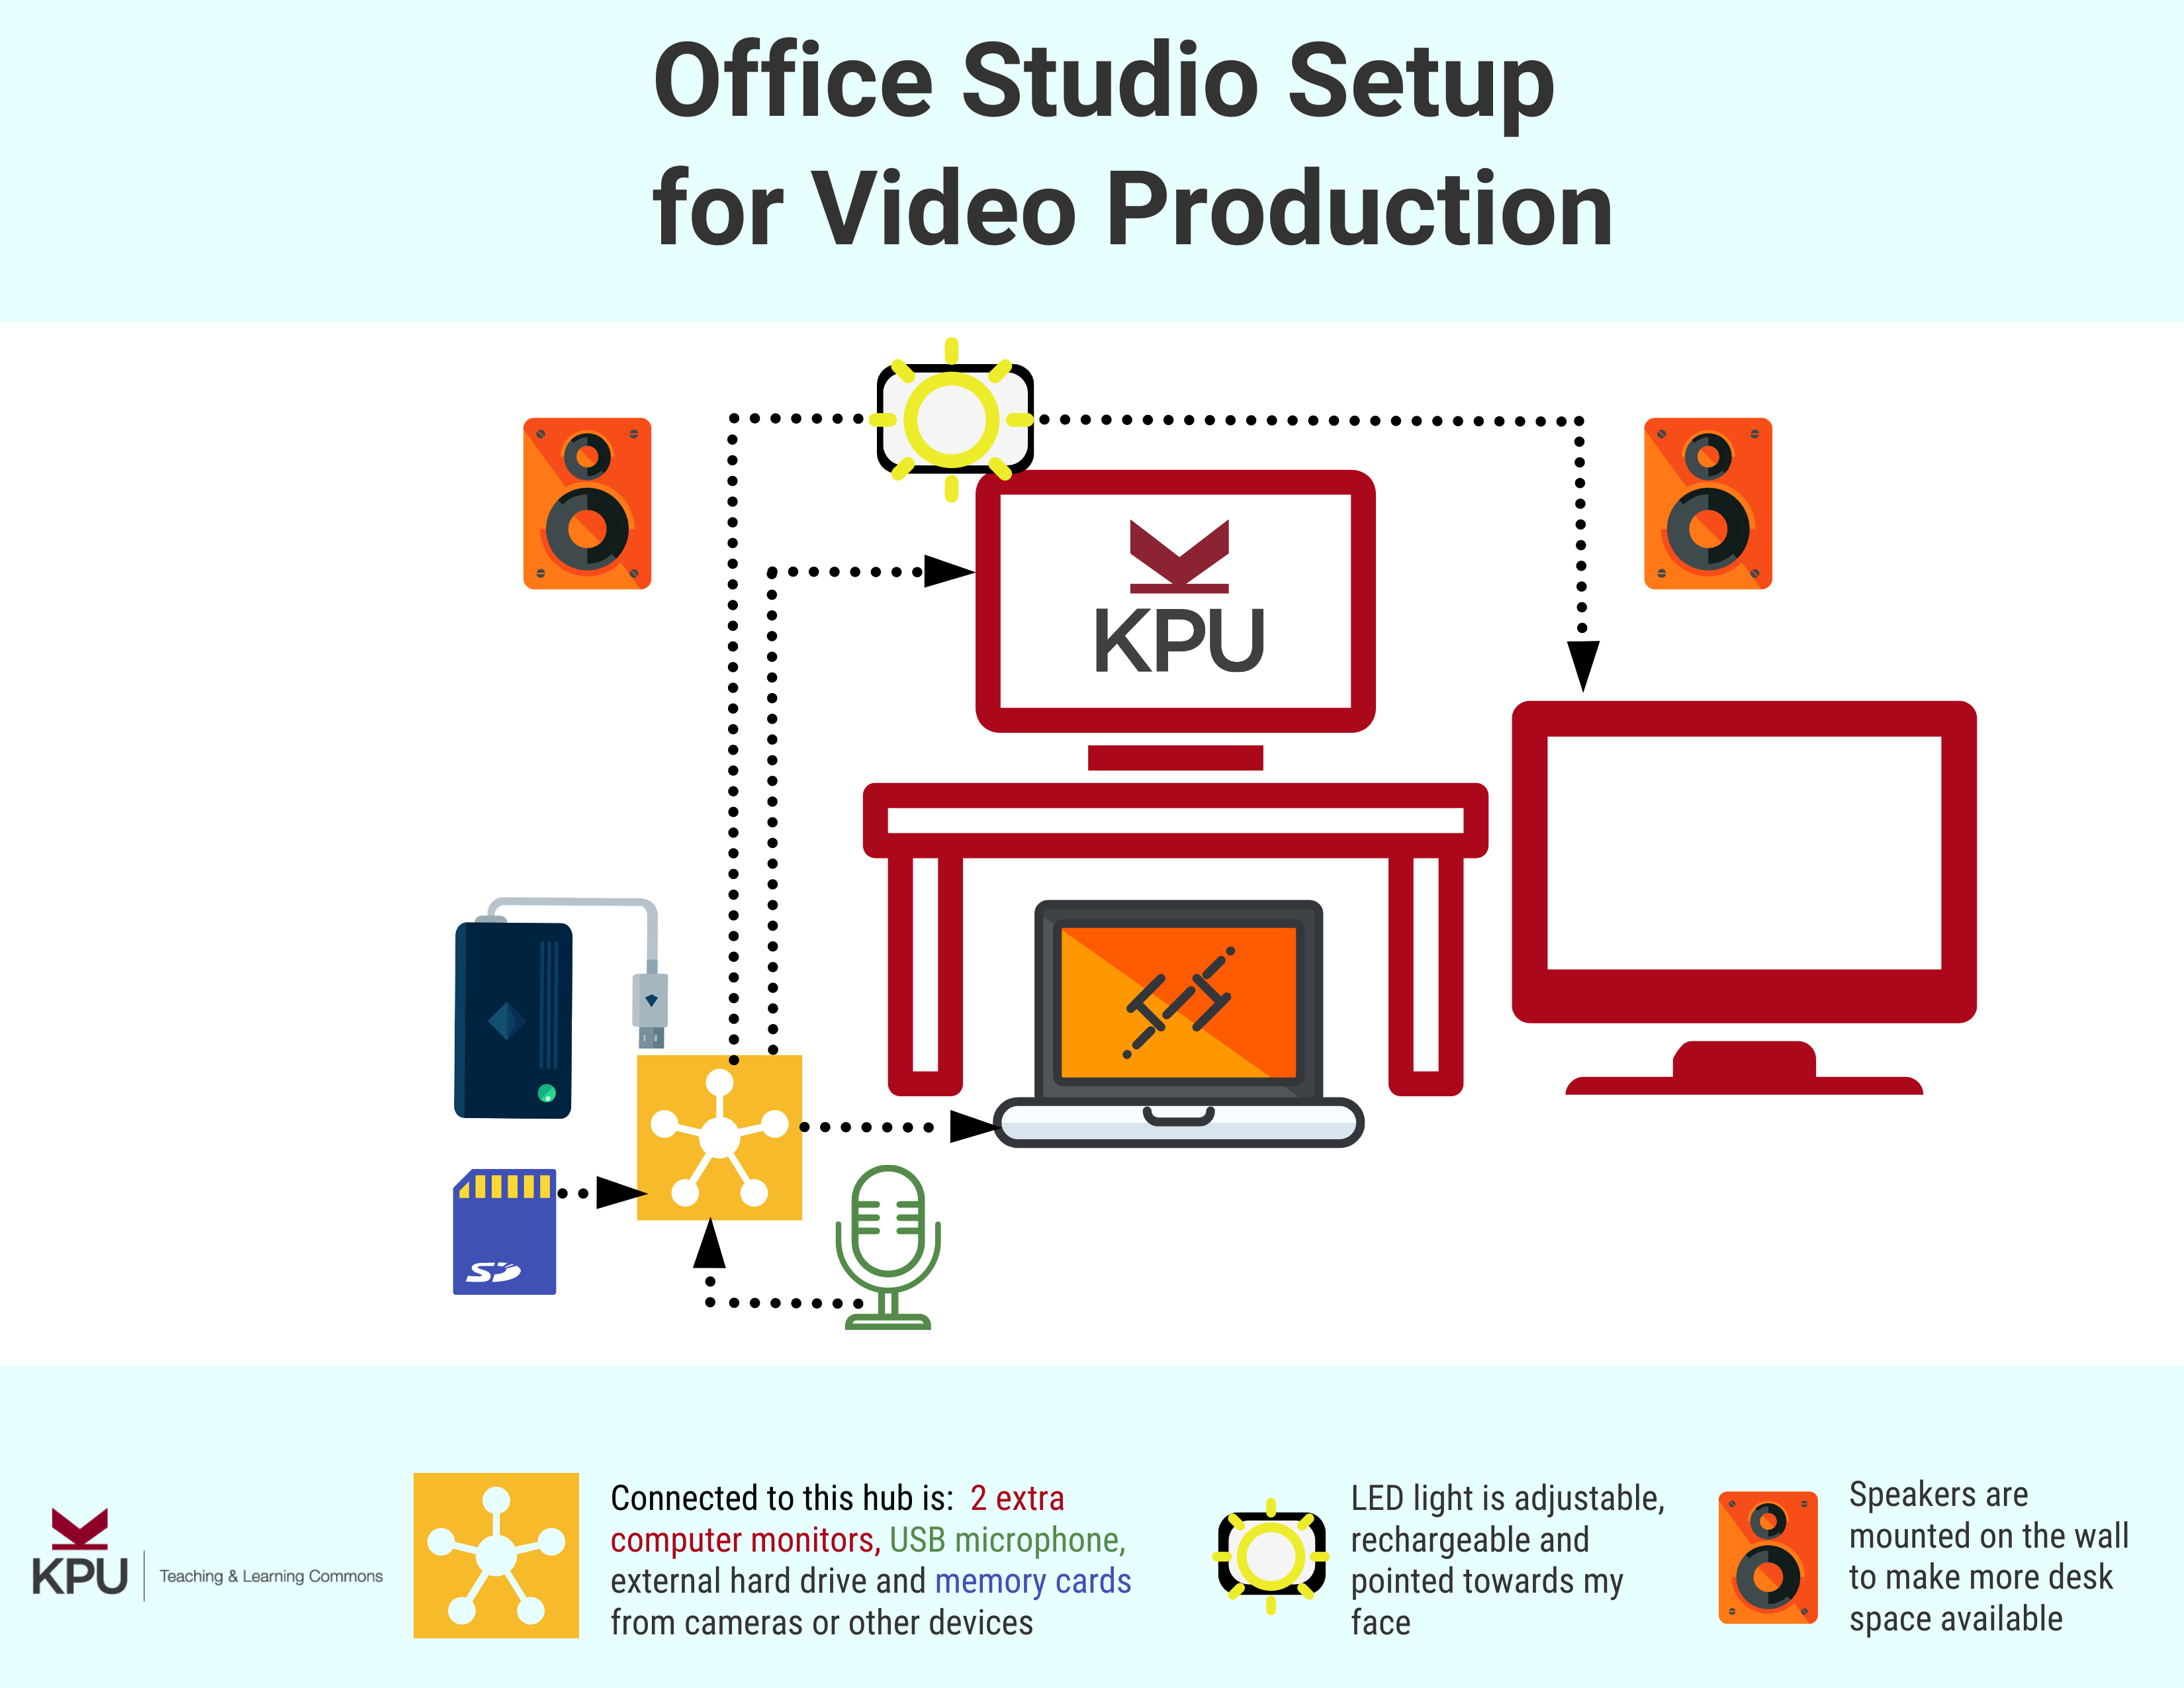
Here are links to all of the products used in this home off setup:
Retractable green screen: https://www.amazon.ca/gp/product/B07QWMS7X5/ref=ppx_yo_dt_b_asin_title_o01_s00?ie=UTF8&psc=1
Adjustable laptop stand: https://www.amazon.ca/gp/product/B07PMJ99MH/ref=ppx_yo_dt_b_asin_title_o06_s00?ie=UTF8&psc=1
Adjustable monitor stand: https://www.amazon.ca/gp/product/B01C09ZSNM/ref=ppx_yo_dt_b_asin_title_o06_s01?ie=UTF8&psc=1
Blue Yeti USB microphone: https://www.amazon.ca/gp/product/B01LY6Z2M6/ref=ppx_yo_dt_b_asin_title_o08_s01?ie=UTF8&psc=1
Dual monitor docking hub: https://www.apple.com/ca/shop/product/HMX12ZM/A/caldigit-ts3-plus-dock?afid=p238%7CsF9EJrKLw-dc_mtid_1870765e38482_pcrid_204238781435_pgrid_45491873498_&cid=aos-ca-kwgo-pla-btb-3pp–slid—product-HMX12ZM/A-CA
Rechargeable LED Light Panel: https://www.amazon.ca/gp/product/B07D8TTFSR/ref=ppx_yo_dt_b_asin_title_o00_s00?ie=UTF8&psc=1
2. The Living Room Video Production Space
A few weeks ago I discovered teleprompters for DSLR cameras. It became instantly an item I HAD to have in my new permanent home-studio space. I don’t know how many hours I’ve spent over the years memorizing scripts for videos or taping printouts of scripts beside or above the camera and attempting to record without appearing to look at the scripts. This is now a thing of the past – for $300 I have made this arduous process redundant. I am now able to create short lessons or lecture videos quickly and simply with – so much so that I was inspired to create a video to show you how it all works!
Below you will see another short video created on my OSMO Pocket that walks you through my living room production setup AND how I’ve incorporated my DSLR camera teleprompter into a living room-based vlogging space.
Here is a diagram of the equipment used in this setup:
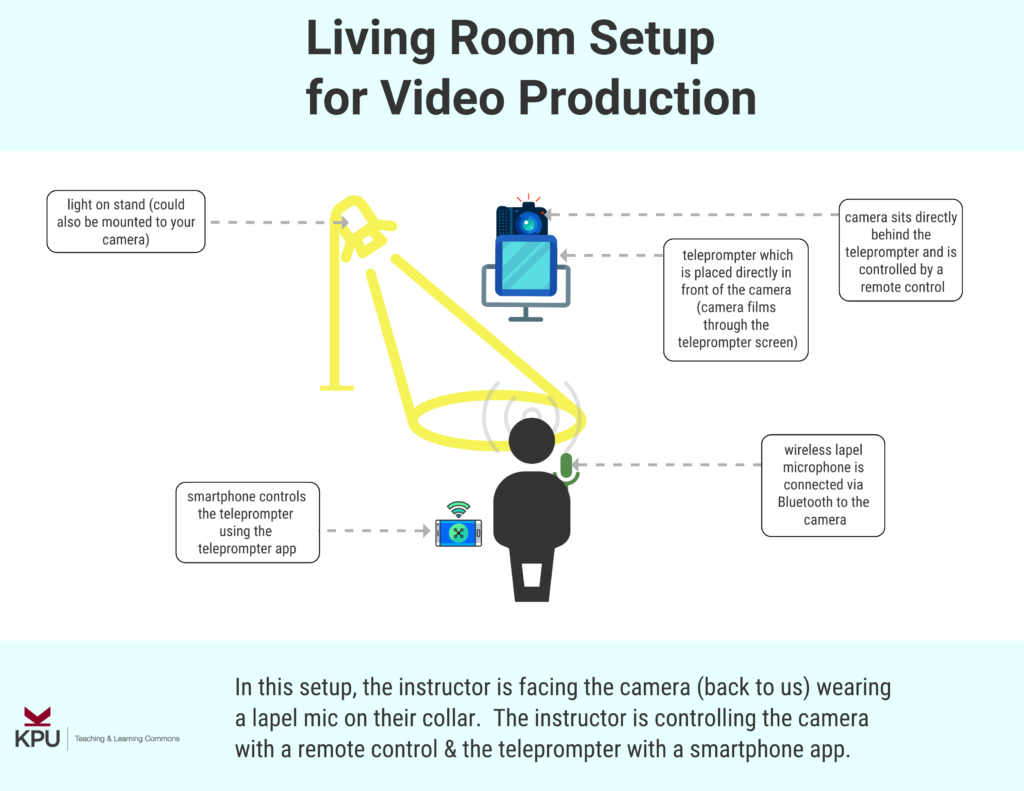
Here are links to all of the components used in this living room setup:
Teleprompter: https://www.amazon.ca/gp/product/B019AJOLEM/ref=ppx_yo_dt_b_asin_title_o03_s00?ie=UTF8&psc=1
Rechargeable LED Light Panel: https://www.amazon.ca/gp/product/B07D8TTFSR/ref=ppx_yo_dt_b_asin_title_o00_s00?ie=UTF8&psc=1
Does this blog post make you want to make some adjustments to your own home-office space? A few upgrades…perhaps???
If the answer is yes then you might find yourself asking “so where do I begin”? If you are new to creating educational media this blog post may be overwhelming and make you feel discouraged. Take it one step at a time, one piece of technology at a time, be patient and kind to yourself, and see it as a journey into new territory. Keep in mind as well that the Teaching & Learning Commons is here for you and I am happy to consult and advise when decide to begin creating or upgrading your home production space! I can be reached via email at gordon.cobb@kpu.ca or you can contact the KPU Teaching & Learning Commons at tlcommons@kpu.ca.
Good luck!